Building Dynamic Forms in Flutter with Stac
Forms are an essential part of human interaction. Whether it’s filing a complaint, signing up for a new app, or completing a KYC process, forms have been deeply integrated into our daily lives. Since the early 19th century, they have evolved from paper-based documents to digital interfaces, becoming a fundamental component of modern applications.
Despite this evolution, most digital forms remain static — offering the same experience to every user. While this approach works for simple cases like login screens, it falls short in more complex scenarios like onboarding or KYC, where form fields should adapt based on user-specific factors. For instance, a KYC form might require different information depending on the user’s country or regulatory requirements.

In this blog, we’ll explore how to build dynamic forms using Stac, a powerful framework that enables flexible, server-driven UI. By leveraging Stac, you can create forms that adapt to user needs in real-time, delivering a more personalized and seamless experience. Let’s dive in!
Prerequisites
✅ Stac Setup — If you haven’t set up Stac yet, head over to the official website and check out the intro blog for a step-by-step guide.
🛠️ Creating the form UI
In this guide, we’ll build a user registration screen that collects user details, calls an API to create a new user, and triggers an action based on whether the API call succeeds or fails. Here’s what our example screen looks like:
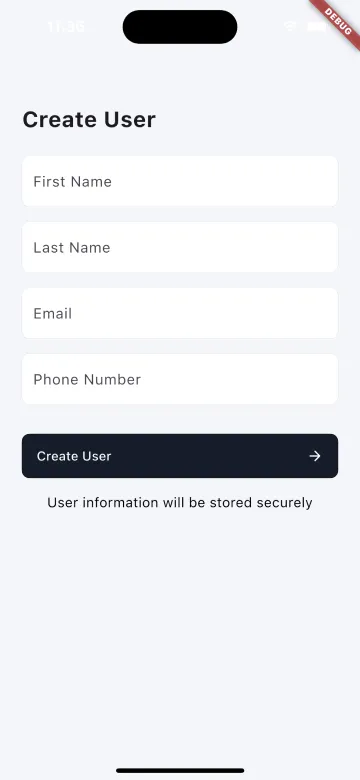
To begin, let’s create a basic scaffold screen with a form widget. As we saw in our intro blog, the structure of Stac JSON closely follows Flutter’s widget tree.
{ "type": "scaffold", "backgroundColor": "#F4F6FA", "appBar": { "type": "appBar", "backgroundColor": "transparent" }, "body": { "type": "form", "child": { "type": "padding", "padding": { "left": 24, "right": 24 }, "child": { "type": "column", "crossAxisAlignment": "start", "children": [] } } }}💡 Note: Wrapping the input fields inside a form widget is crucial — it allows you to validate fields and retrieve their values when submitting the form.
Now that our basic structure is ready, let’s add text fields and an action button.
Adding Input Fields
The basic text form field structure in Stac JSON looks like this.
{ "type": "textFormField", "id": "firstName", "autovalidateMode": "onUserInteraction", "validatorRules": [ { "rule": "isName", "message": "Please enter your first name" } ], "style": { "fontSize": 16, "fontWeight": "w400", "height": 1.5 }, "decoration": { "hintText": "First Name", "filled": true, "fillColor": "#FFFFFF", "border": { "type": "outlineInputBorder", "borderRadius": 8, "color": "#24151D29" } }}🔑 There are three key properties in this JSON:
type— Specifies the widget type (textFormField in this case).id— Used to retrieve the field’s value when submitting the form.validatorRules— Defines validation rules. You can use regex or built-in validators.
Building the Complete Form
Now, let’s add all required input fields along with a Submit button.
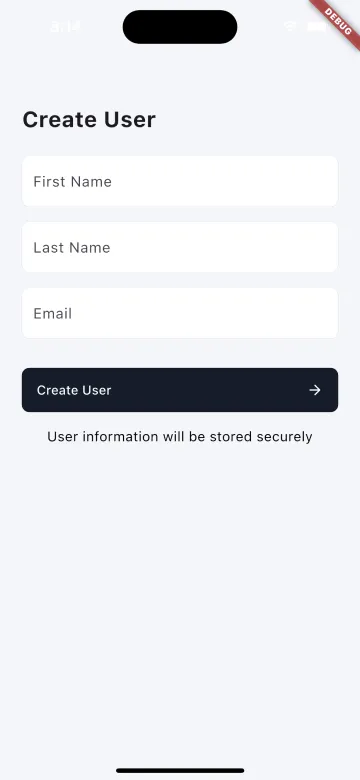
{ "type": "scaffold", "backgroundColor": "#F4F6FA", "appBar": { "type": "appBar", "backgroundColor": "transparent" }, "body": { "type": "form", "child": { "type": "padding", "padding": { "left": 24, "right": 24 }, "child": { "type": "column", "crossAxisAlignment": "start", "children": [ { "type": "text", "data": "Create User", "style": { "fontSize": 24, "fontWeight": "w700", "height": 1.3 } }, { "type": "sizedBox", "height": 24 }, { "type": "textFormField", "id": "firstName", "autovalidateMode": "onUserInteraction", "validatorRules": [ { "rule": "isName", "message": "Please enter your first name" } ], "style": { "fontSize": 16, "fontWeight": "w400", "height": 1.5 }, "decoration": { "hintText": "First Name", "filled": true, "fillColor": "#FFFFFF", "border": { "type": "outlineInputBorder", "borderRadius": 8, "color": "#24151D29" } } }, { "type": "sizedBox", "height": 16 }, { "type": "textFormField", "id": "lastName", "autovalidateMode": "onUserInteraction", "validatorRules": [ { "rule": "isName", "message": "Please enter your last name" } ], "style": { "fontSize": 16, "fontWeight": "w400", "height": 1.5 }, "decoration": { "hintText": "Last Name", "filled": true, "fillColor": "#FFFFFF", "border": { "type": "outlineInputBorder", "borderRadius": 8, "color": "#24151D29" } } }, { "type": "sizedBox", "height": 16 }, { "type": "textFormField", "id": "email", "autovalidateMode": "onUserInteraction", "validatorRules": [ { "rule": "isEmail", "message": "Please enter a valid email" } ], "style": { "fontSize": 16, "fontWeight": "w400", "height": 1.5 }, "decoration": { "hintText": "Email", "filled": true, "fillColor": "#FFFFFF", "border": { "type": "outlineInputBorder", "borderRadius": 8, "color": "#24151D29" } } }, { "type": "sizedBox", "height": 16 }, { "type": "textFormField", "id": "phoneNumber", "autovalidateMode": "onUserInteraction", "validatorRules": [ { "rule": "^(\\+\\d{1,2}\\s?)?\\(?\\d{3}\\)?[\\s.-]?\\d{3}[\\s.-]?\\d{4}$", "message": "Please enter a valid phone number" } ], "style": { "fontSize": 16, "fontWeight": "w400", "height": 1.5 }, "decoration": { "hintText": "Phone Number", "filled": true, "fillColor": "#FFFFFF", "border": { "type": "outlineInputBorder", "borderRadius": 8, "color": "#24151D29" } } }, { "type": "sizedBox", "height": 32 }, { "type": "filledButton", "style": { "backgroundColor": "#151D29", "shape": { "borderRadius": 8 } }, "onPressed": {}, "child": { "type": "padding", "padding": { "top": 14, "bottom": 14, "left": 16, "right": 16 }, "child": { "type": "row", "mainAxisAlignment": "spaceBetween", "children": [ { "type": "text", "data": "Create User" }, { "type": "icon", "iconType": "material", "icon": "arrow_forward" } ] } } }, { "type": "sizedBox", "height": 16 }, { "type": "align", "alignment": "center", "child": { "type": "text", "data": "User information will be stored securely", "textAlign": "center", "style": { "fontSize": 15, "fontWeight": "w400", "color": "#000000" } } } ] } } }}Here is our form screen.
Instantly Update Forms
With Stac’s server-driven nature, you can modify the form on the fly without redeploying the app. For example, let’s add a phone number field:
{ "type": "textFormField", "id": "phoneNumber", "autovalidateMode": "onUserInteraction", "validatorRules": [ { "rule": "^(\\+\\d{1,2}\\s?)?\\(?\\d{3}\\)?[\\s.-]?\\d{3}[\\s.-]?\\d{4}$", "message": "Please enter a valid phone number" } ], "style": { "fontSize": 16, "fontWeight": "w400", "height": 1.5 }, "decoration": { "hintText": "Phone Number", "filled": true, "fillColor": "#FFFFFF", "border": { "type": "outlineInputBorder", "borderRadius": 8, "color": "#24151D29" } }}Once this JSON is updated, the new field will instantly appear in the app — no need to push an app update. 🎉
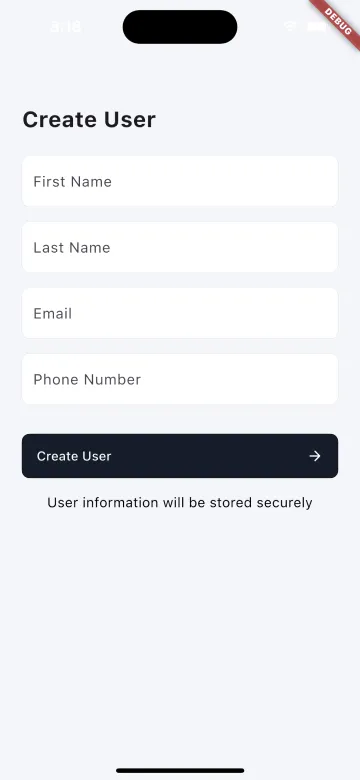
Now that our form is fully functional, we can proceed to handle API calls and user actions.
✅ Validating the Form
Form validation in Stac is easy! Just follow these two simple steps:
1. Define Validation Rules
Specify validation rules for your fields to ensure users enter the correct information.
{ "autovalidateMode": "onUserInteraction", "validatorRules": [ { "rule": "isName", "message": "Please enter your first name" } ]}This ensures that the field is validated as the user types, prompting them if the input doesn’t match the expected format.
2. Trigger Validation
When the form is submitted, call the validateForm action to check if the input is valid.
{ "onPressed": { "actionType": "validateForm", "isValid": {}, "isNotValid": {} }}The validateForm action provides two key callbacks:
-
isValid → Called when all fields pass validation ✅
-
isNotValid → Called when there’s an error ❌
With just these two steps, you ensure users enter the right information before proceeding. No more incomplete forms slipping through! 🚀
🚀 Submitting the Form
Now that our form is validated, it’s time to submit it and call our API. For this example, we’ll use the dummy JSON Add User API.
In Stac, API calls are handled using the networkRequest action. Just like any other network request, you’ll provide the URL, method, headers, and body. But here’s the cool part — we don’t hardcode the body values. Instead, we use the getFormValue action to dynamically fetch values from form fields.
📝 Note: The id in getFormValue must match exactly with the id of the textFormField to fetch the correct values.
📤 Making the API Call
Here’s how we submit the form and send user details to the API:
{ "onPressed": { "actionType": "validateForm", "isValid": { "actionType": "networkRequest", "url": "https://dummyjson.com/users/add", "method": "post", "headers": { "Content-Type": "application/json" }, "body": { "firstName": { "actionType": "getFormValue", "id": "firstName" }, "lastName": { "actionType": "getFormValue", "id": "lastName" }, "email": { "actionType": "getFormValue", "id": "email" }, "phoneNumber": { "actionType": "getFormValue", "id": "phoneNumber" } } } }}🎯 Handling API Responses
Stac makes it easy to listen to API responses and trigger actions based on the status code returned. This means you can show success messages or handle errors seamlessly.
✅ Defining API Response Actions
Here’s how we handle different API responses:
{ "results": [ { "statusCode": 201, "action": { "actionType": "showDialog", "widget": { "type": "alertDialog", "title": { "type": "text", "data": "Successful" } } } }, { "statusCode": 400, "action": { "actionType": "showDialog", "widget": { "type": "alertDialog", "title": { "type": "text", "data": "Error" } } } } ]}🎉 And That’s It! With just a few steps, we’ve built a fully functional, dynamic form that submits data and handles responses — without touching native code!
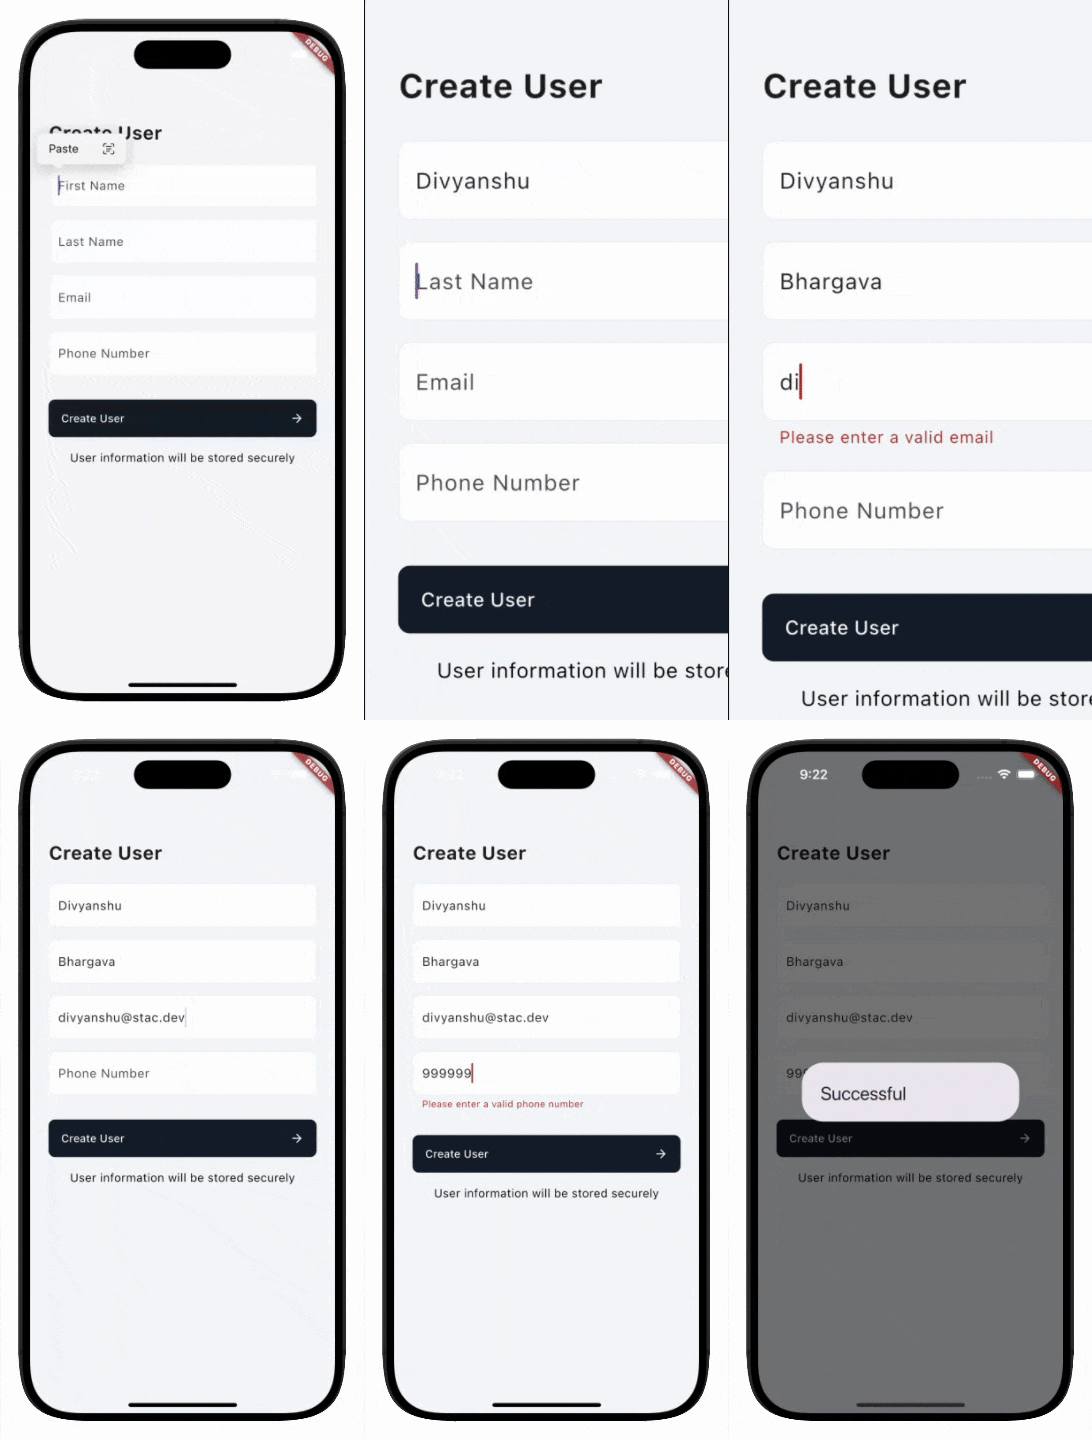
Next time you need to add or update fields, you don’t have to go through the hassle of modifying app logic — just tweak the JSON and your app updates instantly! 🎯
Here is the final JSON.
{ "type": "scaffold", "backgroundColor": "#F4F6FA", "appBar": { "type": "appBar", "backgroundColor": "transparent" }, "body": { "type": "form", "child": { "type": "padding", "padding": { "left": 24, "right": 24 }, "child": { "type": "column", "crossAxisAlignment": "start", "children": [ { "type": "text", "data": "Create User", "style": { "fontSize": 24, "fontWeight": "w700", "height": 1.3 } }, { "type": "sizedBox", "height": 24 }, { "type": "textFormField", "id": "firstName", "autovalidateMode": "onUserInteraction", "validatorRules": [ { "rule": "isName", "message": "Please enter your first name" } ], "style": { "fontSize": 16, "fontWeight": "w400", "height": 1.5 }, "decoration": { "hintText": "First Name", "filled": true, "fillColor": "#FFFFFF", "border": { "type": "outlineInputBorder", "borderRadius": 8, "color": "#24151D29" } } }, { "type": "sizedBox", "height": 16 }, { "type": "textFormField", "id": "lastName", "autovalidateMode": "onUserInteraction", "validatorRules": [ { "rule": "isName", "message": "Please enter your last name" } ], "style": { "fontSize": 16, "fontWeight": "w400", "height": 1.5 }, "decoration": { "hintText": "Last Name", "filled": true, "fillColor": "#FFFFFF", "border": { "type": "outlineInputBorder", "borderRadius": 8, "color": "#24151D29" } } }, { "type": "sizedBox", "height": 16 }, { "type": "textFormField", "id": "email", "autovalidateMode": "onUserInteraction", "validatorRules": [ { "rule": "isEmail", "message": "Please enter a valid email" } ], "style": { "fontSize": 16, "fontWeight": "w400", "height": 1.5 }, "decoration": { "hintText": "Email", "filled": true, "fillColor": "#FFFFFF", "border": { "type": "outlineInputBorder", "borderRadius": 8, "color": "#24151D29" } } }, { "type": "sizedBox", "height": 16 }, { "type": "textFormField", "id": "phoneNumber", "autovalidateMode": "onUserInteraction", "validatorRules": [ { "rule": "^(\\+\\d{1,2}\\s?)?\\(?\\d{3}\\)?[\\s.-]?\\d{3}[\\s.-]?\\d{4}$", "message": "Please enter a valid phone number" } ], "style": { "fontSize": 16, "fontWeight": "w400", "height": 1.5 }, "decoration": { "hintText": "Phone Number", "filled": true, "fillColor": "#FFFFFF", "border": { "type": "outlineInputBorder", "borderRadius": 8, "color": "#24151D29" } } }, { "type": "sizedBox", "height": 32 }, { "type": "filledButton", "style": { "backgroundColor": "#151D29", "shape": { "borderRadius": 8 } }, "onPressed": { "actionType": "validateForm", "isValid": { "actionType": "networkRequest", "url": "https://dummyjson.com/users/add", "method": "post", "headers": { "Content-Type": "application/json" }, "body": { "firstName": { "actionType": "getFormValue", "id": "firstName" }, "lastName": { "actionType": "getFormValue", "id": "lastName" }, "email": { "actionType": "getFormValue", "id": "email" }, "phoneNumber": { "actionType": "getFormValue", "id": "phoneNumber" } }, "results": [ { "statusCode": 201, "action": { "actionType": "showDialog", "widget": { "type": "alertDialog", "title": { "type": "text", "data": "Successful" } } } }, { "statusCode": 400, "action": { "actionType": "showDialog", "widget": { "type": "alertDialog", "title": { "type": "text", "data": "Error" } } } } ] } }, "child": { "type": "padding", "padding": { "top": 14, "bottom": 14, "left": 16, "right": 16 }, "child": { "type": "row", "mainAxisAlignment": "spaceBetween", "children": [ { "type": "text", "data": "Create User" }, { "type": "icon", "iconType": "material", "icon": "arrow_forward" } ] } } }, { "type": "sizedBox", "height": 16 }, { "type": "align", "alignment": "center", "child": { "type": "text", "data": "User information will be stored securely", "textAlign": "center", "style": { "fontSize": 15, "fontWeight": "w400", "color": "#000000" } } } ] } } }}main.dart
import 'package:flutter/material.dart';import 'package:stac/stac.dart';
void main() async { await Stac.initialize();
runApp(const MyApp());}
class MyApp extends StatelessWidget { const MyApp({super.key});
@override Widget build(BuildContext context) { return MaterialApp( title: 'Stac Dynamic Form', home: Stac.fromAssets('assets/json/create_user.json'), ); }}Thank you for reading 👋
🚀 Want to explore more about Stac? Check out:
🔗 Website: stac.dev
💻 GitHub: github.com/StacDev/Stac
Happy Coding… See you next time 👋
